Friday, January 30, 2009

It's Simple!

One thing I do enjoy once in a while is a good cup of coffee, and when I seen this stamp set by Flourishes, it was one of those must have moments. So the challenge today was to make a CAS (Clean and Simple) card. This is about as simple as I can get.. LOL! I shy away from doing cards like this, but I am not sure wh as it only took me about 10 minutes versus all the time I spent yesterday.


Details:
Cardstock: Whisper White (SU)

Stamps: Coffee With Friends (Flourishes)

Ribbon: American Crafts

Brads: Bejeweled Brads (imaginisce)
Ink: Blazing Red, Black (Stazon)

Thursday, January 29, 2009

Vintage Butterly!


Today was one of those days when it took me almost all day to make a card. I found this cuttlebug challenge and decided to try it. So when it comes to distressing I immediatly think of something Victorian, and this is it... So I cuttlebugged to my hearts content and also used a lot of distressing techniques on the edges as well as sanding over the embossed areas. I even embossed that poor little butterfly... HE HE! I just had to add a button because what is Victorian without buttons.. LOL! I also had to add some bling...


Card Details:
Cardstock: River Rock, Confetti Cream (SU), Ocean Tides (Papertrey Ink)
DP: Company K Clasic K Margo
Stamps: Baroque Motifs (SU) Butterfly (NS)
Ribbon: Spare Parts
Accessories: Button (Misc) Bliss Pearls (Kaiser Scrapbooks) Metal (NS)
Tools: Cuttlebug, Distressing Tool (SU), Sandpaper
Ink: So Saffron, Blue Bayou, Basic Brown (SU)

Wednesday, January 28, 2009

Blog Candy!

Come check out this Blog Candy!

Happy Valentines Day!


I made this card for the 2Sketches4You challenge. The bg is made using the bg stamp Bella Toile from SU. I stamped in onto Whisper White paper using Black Staz-on. I layered in onto red and white, stitching around it with red thread. The "Love" sentiment is from Flourishes Lace Heart stamp set and the sentiment "you mean everything to me" is from SU Always stamp set. I also used the swiss dots folder for the cuttlebug to texture the circle panel, I used nestabilities to cut out the scalloped circle and the regular circle. The ribbon was intertwined and stitched onto the main panel, and the small saying was attached using a pearl pin. I also added some small jewels from K and Co. in the top left corner. TFL!

Monday, January 26, 2009

Boo Hoo!

So today was a non-stamping day, even though I did want to join in on the challenge (I had an awesome idea), but had a tooth emergency today and had to take in my 7 year old for an extraction today. They extracted his tooth and fit him for a spacer so we will have to go back in a couple of weeks to have the spacer in. Hopefully I can stamp tomorrow...

Friday, January 23, 2009

Rustic Avocado


Today Limited Supply Challenge was to use black as your main color, therefore you must have a large space of black. YIKES, kind of scary... So I decided to use my new Rustic Rooster set from SU. This set was a must have as my kitchen is all roosters and pears, and how could I pass up this adorable rooster. This was the first time I inked it and I just think he is sooooo cute.


So, for the challenge. I decided to use Papertrey Inks Ripe Avocado paper and SU Basic Black. I used the cuttlebug and embossed the black paper, rubbing over it carefully using a White Stazon to accent the letters. I also decided to sew the black paper to the Avocado paper using a zig zag stitch on my sewing machine. Before stitching I attached the papers using an adhesive so they would stay where I wanted them. I used my Nestabilities for the main image cutout, trimming around the white panel using a black piece of paper to help it stand out. I stamped the Rooster using Basic Black ink and colored it in using Watercolor Crayons, also from SU, blending the colors using the blender pens. The larger panel was cut using Ripe Avocado and embossed using the Swiss Dots folder. I added some brads in the corners of the small panel, added some black accents to the top right corner and a small piece of chipboard for my sentiment. I added ribbon in the center. TFL!

Thursday, January 22, 2009

Baby Boy!


Todays SCS challenge was to make Patterned Paper that you have at home and add pizzaz. The challenge can be found here. For today I decided to make a card using some paper I got from Papertrey Ink. I just love this paper and it was the inspiration for todays card. First I chose three kinds of PP from the Men of Life collection of paper and two kinds of CS. Spring Moss and also Spring Rain, both from Papertrey. I used liquid embossing for the stripes and dots to add some extra dimension. I also used the cuttlebug and the swiss dots folder to add some texture to the scalloped panel. The stamp was from a Martha Stewart stamp set and I stamped in onto two different kinds of fabric and cut out the sails, pasting them onto my CS. I cut a small piece of ribbon to add at the bottom for the rest of the boat, and a small stick for the middle of the sail. Tied on the ribbon and also added some pearls from Kaiser Scrapbook (Bliss). Now I have a card I can use for a baby shower or for a small boys birthday.


Tuesday, January 20, 2009

Hearty Valentine

Today was one of those rare days that I make more than one
card. This card was made using the sketch challenge from the
Verve Challenge Week 3.

I chose the colors for this card by using the dp from Papertrey Ink. The stamp set I chose for this card is the Heart of Fire set from Verve. I used paper from Papertrey Ink, and from SU. The texture on the papers was done using the cuttlebug.

Color Challenge


My card today was made for the Color Challenge on SCS. These colors were a bit of a challenge for me so I opted to keep my card simple. I used the BB paper for the bg and embossed it using my cuttlebug swiss dots folder. I used the top note from SU for the main panel. I stamped on the flower stems using a stamp from Autumn Leaves and Old Olive ink from SU. I LOVE using buttons on cards so I used buttons for the flowers. I also stamped the butterfly using Cranberry Crisp ink and ran it through the CB for some added texture, cut it out an mounted it above the flowers. I also added a piece of ribbon and some faux pearls.


Friday, January 16, 2009

Simply Easy Valentines Cards!

Today was the Limited Supply Challege on SCS. The challenge was to make valentines cards that were simple and easy to replicate. You can read more about the challenge on SCS under the Friday challenge.


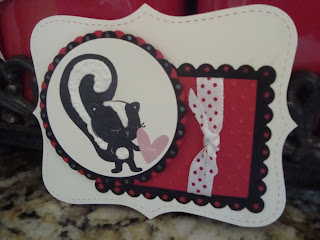
My first card was made using the Top Note from SU. I also layered a panel of basic black and real red using the rectangle nestabilities. I cuttlebugged the small red panel using the swiss dots folder. I also used my circle nesties for the circle panel, layering real red, basic black, and very vanilla. I stamped on the little skunk from Stinkin Cute (SU) and added some ribbon.


This card was made using the nestabilities, I also cuttlebugged the back panel using a scripted folder. I cut out the main panel on very vanilla paper and added a layer of basic black did some faux stitching, added a small heart, some ribbon and some accents. This one was very quick and came out so cute.


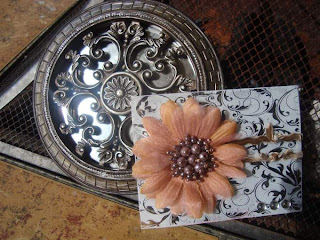
This card was made for the Flourishes Celebrating Home challenge. I just love their stamps and this bg stamp is one of my favorites. I stamped it on Flourishes crystal clear cs using white stazon and added some ribbon and a large prima that I cut off a ponytail holder. The mirror that is in the bg is what I used for my inspiration for this card.


  © Blogger templates The Professional Template by Ourblogtemplates.com 2008

Back to TOP